

In this blog post we will see how we can fully automate macOS app updates with Sparkle 2 + GitHub Actions + GitHub Pages. We will build, notarize, sign, auto-generate appcast.xml and DMG files, etc. using GitHub Actions whenever you create a new release (this can be changed to on commit too).
Highlights:
- Build your app on macOS runners
- Re-sign Sparkle components properly
- Notarize your app and DMG
- Sign the DMG with Sparkle’s Ed25519 key
- Generate an
appcast.xmlfrom the GitHub Release notes - Publish the DMG and appcast to a public repo served via GitHub Pages
The guide uses a reusable, commented GitHub Actions workflow as reference: sparkle-publish.yml gist. The gist uses placeholders such as APP_NAME, PROJECT_FILE, BUNDLE_IDENTIFIER, UPDATE_BASE_URL, and UPDATES_REPO_SSH, so you can adapt it without changing the script internals.
What you’ll need
- A macOS app already set up with Sparkle 2 (framework embedded) and the public update key in
Info.plist. - A Developer ID Application certificate (installed locally in Keychain) to sign your app for distribution outside the Mac App Store.
- An Apple ID with two-factor auth and an App-Specific Password.
- A GitHub repo for your app (private or public) where the workflow runs.
- A second public GitHub repo (e.g.,
yourname/myapp-updates) where the DMG +appcast.xmlwill be published via GitHub Pages.
Step 1 — Create a public “updates” repo and enable GitHub Pages
- Create a new public repo, e.g.,
yourname/myapp-updates. - Go to Settings → Pages → Build and deployment:
- Source: Deploy from a branch
- Branch:
main(or your default), folder:/(root) - Save
- Pages URL will look like:
https://<your-username>.github.io/<updates-repo>/- Your future appcast URL will be:
https://<your-username>.github.io/<updates-repo>/appcast.xml
Optional: If you use a custom domain, add your CNAME file and DNS before continuing.
Step 2 — Create a GitHub Deploy Key pair for publishing
You’ll push from the app’s repo (CI) into the public “updates” repo via SSH using a deploy key.
Generate a dedicated key pair on your machine (no passphrase):
ssh-keygen -t ed25519 -C "gh-actions deploy key for <updates-repo>" -N "" -f github_deploy_key
# Produces github_deploy_key (private) and github_deploy_key.pub (public)
Wire it up:
- In the UPDATES repo (public): Settings → Deploy keys → Add deploy key
- Title: “GitHub Actions (from
)" - Key: contents of
github_deploy_key.pub - Enable “Allow write access”
- Title: “GitHub Actions (from
- In the APP repo (where the workflow runs): Settings → Secrets and variables → Actions → New repository secret
- Name:
DEPLOY_KEY - Value: full text of
github_deploy_key(the private key)
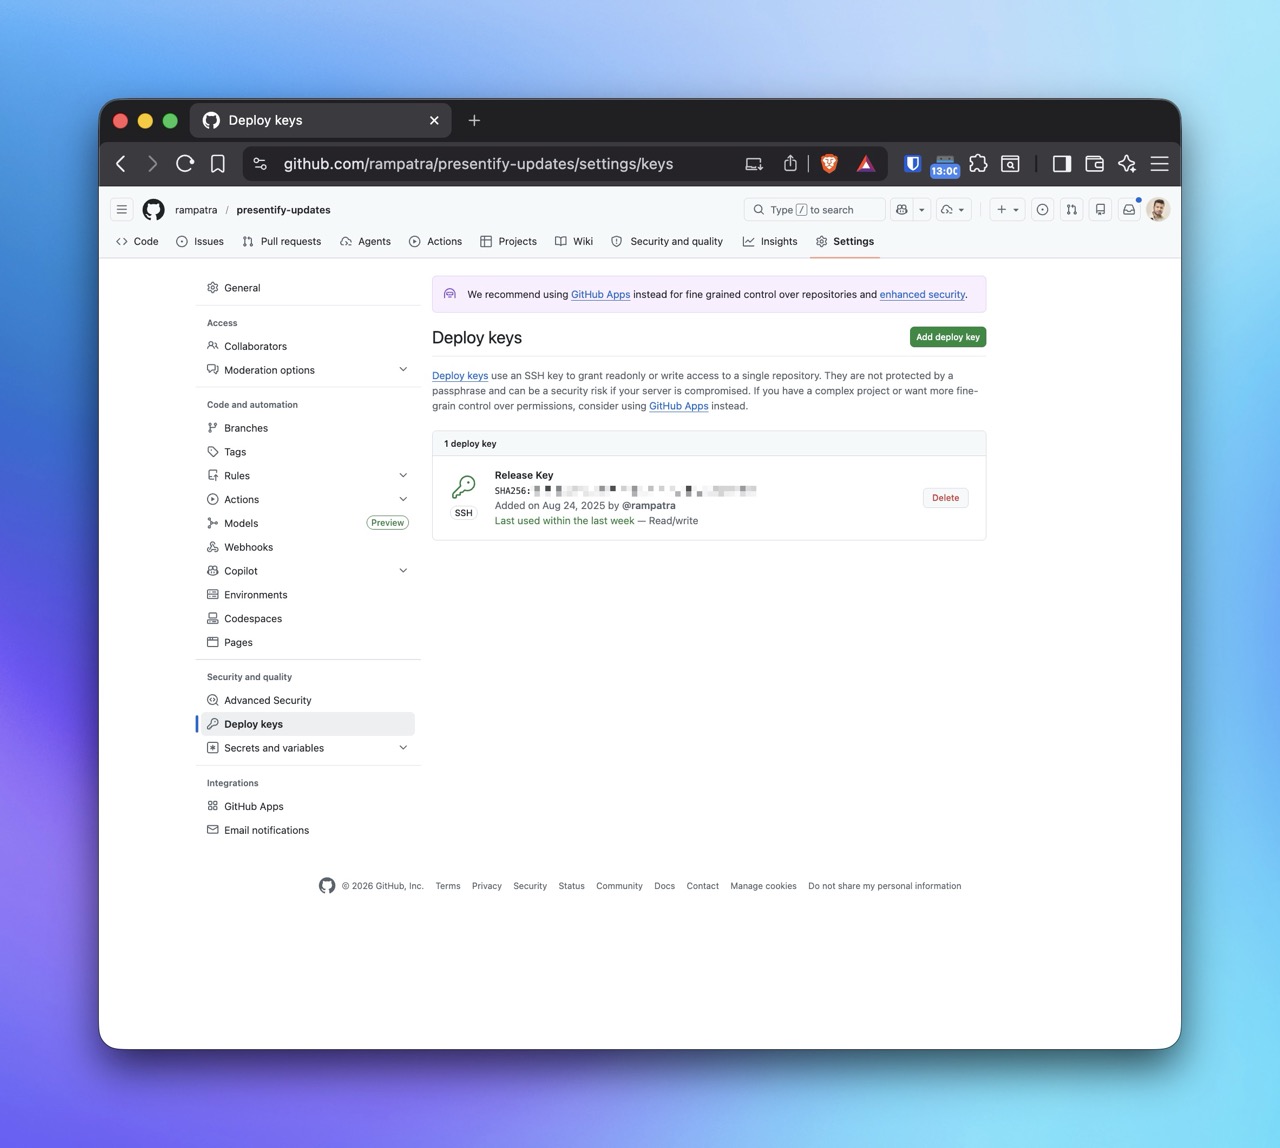
- Name:
The final deploy key setup in the UPDATES repo should look like this:
Step 3 — Generate Sparkle Ed25519 keys and embed the public key in your app
Sparkle 2 uses Ed25519 for update signatures. You must embed the public key in the app, and keep the private key in CI.
Generate keys using Sparkle’s CLI (installed via Sparkle project or the workflow step installs the CLI for you):
# From Sparkle 2 source (or installed tools)
generate_keys
This prints a public key and a private key. Do the following:
- In your app’s
Info.plist, set the public key underSUPublicEDKey. - In the APP repo, add the private key as a secret:
- Name:
SPARKLE_PRIVATE_KEY - Value: the exact private key string (don’t add newlines unless included)
- Name:
Your app must also have its feed URL set (either at runtime or in Info.plist):
SUFeedURL→https://<your-username>.github.io/<updates-repo>/appcast.xml
Step 4 — Export your Developer ID Application certificate as a .p12
- Open Keychain Access → My Certificates → find “Developer ID Application:
( )". - Right-click → Export → format
.p12→ choose a password (optional, can be empty). - Base64-encode the
.p12so it’s safe to store in GitHub Secrets:
# macOS
base64 -i DeveloperID.p12 | pbcopy

# (or)
base64 < DeveloperID.p12 > developer_id_base64.txt
Add these to the APP repo secrets:
DEV_ID_P12_BASE64→ the base64 string of your.p12DEV_ID_P12_PASSWORD→ the password you set when exporting (leave empty if none)
Optional but helpful:
DEV_ID_SIGN_IDENTITY→ exact identity string, e.g.,Developer ID Application: Your Name (TEAMID)- If omitted, the workflow will auto-detect a Developer ID Application identity from the imported keychain.
Step 5 — Create an Apple App-Specific Password and note your Team ID
APPLE_ID→ your Apple ID email (used for notarization)APPLE_APP_PASSWORD→ create athttps://appleid.apple.com→ Sign-In & Security → App-Specific Passwords → GenerateAPPLE_TEAM_ID→ find athttps://developer.apple.com/account/(also visible in many Apple developer emails and certificates)
Add all three as APP repo secrets.
Step 6 — Add the GitHub Actions workflow
Create .github/workflows/sparkle-publish.yml in your APP repo using the commented template here: sparkle-publish.yml gist. The template keeps the values you need to change at the top of the file:
APP_NAME— your macOS app name, without.appPROJECT_FILE— your.xcodeprojSCHEME_NAME— your Xcode schemeBUNDLE_IDENTIFIER— your app bundle identifier, used to verify Sparkle service entitlementsENTITLEMENTS_PATH— your app entitlements file, or blank if you do not use oneUPDATE_BASE_URL— your GitHub Pages URL, e.g.,https://<your-username>.github.io/<updates-repo>UPDATES_REPO_SSH— the SSH URL of your public updates repoUPDATES_BRANCH— the branch to push DMG andappcast.xmlto, usuallymain
Below is a shortened excerpt showing the important shape of the template. Use the full gist for the complete workflow:
name: Sparkle Publish

on:
  release:
    types: [published]

env:
  # CHANGE: Your macOS app name, without ".app".
  APP_NAME: YourApp

  # CHANGE: Your Xcode project file.
  PROJECT_FILE: YourApp.xcodeproj

  # CHANGE: Your Xcode scheme name.
  SCHEME_NAME: YourApp

  # CHANGE: Your app bundle identifier.
  BUNDLE_IDENTIFIER: com.example.YourApp

  # CHANGE: Path to your app entitlements file. Leave blank if your app does not use one.
  ENTITLEMENTS_PATH: YourApp/YourApp.entitlements

  # CHANGE: Public base URL where appcast.xml and the DMG will be hosted.
  UPDATE_BASE_URL: https://your-username.github.io/your-updates-repo

  # CHANGE: SSH URL of the repo where appcast.xml and DMGs will be published.
  UPDATES_REPO_SSH: [email protected]:your-username/your-updates-repo.git

  # CHANGE if needed: Branch of the updates repo to push to.
  UPDATES_BRANCH: main

jobs:
  build:
    runs-on: macos-15

    steps:
      - uses: actions/checkout@v4

      - name: Select Xcode 26.2
        uses: maxim-lobanov/setup-xcode@v1
        with:
          xcode-version: '26.2'

      - name: Install tools
        run: brew install create-dmg jq

      - name: Setup Sparkle CLI tools
        uses: jozefizso/setup-sparkle@v1
        with:
          version: 2.7.1

      # 1) Import Developer ID .p12 into a temporary keychain.
      - name: Import Developer ID certificate
        env:
          # PROVIDE SECRET: Base64-encoded Developer ID Application .p12 certificate.
          DEV_ID_P12_BASE64: ${{ secrets.DEV_ID_P12_BASE64 }}

          # PROVIDE SECRET: Password for the .p12 certificate. Can be blank if the .p12 has no password.
          DEV_ID_P12_PASSWORD: ${{ secrets.DEV_ID_P12_PASSWORD }}
        run: |
          set -euo pipefail
          KEYCHAIN=build.keychain
          KEYCHAIN_PASSWORD=$(uuidgen)
          security create-keychain -p "$KEYCHAIN_PASSWORD" "$KEYCHAIN"
          security set-keychain-settings -lut 21600 "$KEYCHAIN"
          security unlock-keychain -p "$KEYCHAIN_PASSWORD" "$KEYCHAIN"
          security list-keychains -d user -s "$KEYCHAIN" login.keychain
          security default-keychain -s "$KEYCHAIN"
          (echo "$DEV_ID_P12_BASE64" | base64 -D > dev_id.p12) || (echo "$DEV_ID_P12_BASE64" | base64 -d > dev_id.p12)
          security import dev_id.p12 -k "$KEYCHAIN" -P "${DEV_ID_P12_PASSWORD:-}" -T /usr/bin/codesign -T /usr/bin/security
          security set-key-partition-list -S apple-tool:,apple: -s -k "$KEYCHAIN_PASSWORD" "$KEYCHAIN"

      # 2) Build app using the template values above.
      - name: Build App
        env:
          # PROVIDE SECRET: Your Apple Developer Team ID.
          APPLE_TEAM_ID: ${{ secrets.APPLE_TEAM_ID }}
        run: |
          xcodebuild -project "$PROJECT_FILE" -scheme "$SCHEME_NAME" -configuration Release -derivedDataPath build \
            CODE_SIGN_STYLE=Manual CODE_SIGN_IDENTITY="Developer ID Application" \
            DEVELOPMENT_TEAM="$APPLE_TEAM_ID" \
            OTHER_CODE_SIGN_FLAGS="--keychain build.keychain --timestamp --options runtime"

      # 3) Re-sign Sparkle nested items and your app with entitlements.

      # 4) Verify the signed app and its Sparkle service identifiers.
      - name: Verify code signing
        run: |
          set -euo pipefail
          APP="build/Build/Products/Release/${APP_NAME}.app"
          APP_ENTITLEMENTS=$(codesign -d --entitlements - "$APP" 2>/dev/null)
          echo "$APP_ENTITLEMENTS" | grep -q "${BUNDLE_IDENTIFIER}-spks"
          echo "$APP_ENTITLEMENTS" | grep -q "${BUNDLE_IDENTIFIER}-spki"
          codesign --verify --deep --strict --verbose=4 "$APP"

      # 5) Zip and notarize the app; staple.
      # 6) Create DMG; notarize; staple.
      # 7) Sign DMG with Sparkle private key.

      - name: Sign DMG with Sparkle
        env:
          # PROVIDE SECRET: Sparkle EdDSA private key generated by Sparkle.
          SPARKLE_PRIVATE_KEY: ${{ secrets.SPARKLE_PRIVATE_KEY }}
        run: |
          set -euo pipefail
          DMG="output/$APP_NAME-${{ steps.version.outputs.version }}.dmg"
          printf "%s" "$SPARKLE_PRIVATE_KEY" > sparkle_ed25519.key
          sign_update --ed-key-file sparkle_ed25519.key "$DMG" | tee signature.txt

      # 8) Extract metadata and release notes.
      - name: Extract metadata
        id: vars
        run: |
          set -euo pipefail
          APP="build/Build/Products/Release/$APP_NAME.app"

          SIZE=$(stat -f%z output/*.dmg)
          VERSION=$(/usr/libexec/PlistBuddy -c "Print CFBundleShortVersionString" "$APP/Contents/Info.plist")
          BUILD=$(/usr/libexec/PlistBuddy -c "Print CFBundleVersion" "$APP/Contents/Info.plist")
          SIG=$(sed -n 's/.*sparkle:edSignature="\([^"]*\)".*/\1/p' signature.txt)

          jq -r '.release.body // ""' "$GITHUB_EVENT_PATH" > notes_temp.txt

          printf 'size=%s\n' "$SIZE" >> "$GITHUB_OUTPUT"
          printf 'version=%s\n' "$VERSION" >> "$GITHUB_OUTPUT"
          printf 'build=%s\n' "$BUILD" >> "$GITHUB_OUTPUT"
          printf 'sig=%s\n' "$SIG" >> "$GITHUB_OUTPUT"

      # 9) Generate appcast.xml.
      - name: Generate appcast.xml
        env:
          VERSION: ${{ steps.vars.outputs.version }}
          BUILD: ${{ steps.vars.outputs.build }}
          SIZE: ${{ steps.vars.outputs.size }}
          SIG: ${{ steps.vars.outputs.sig }}
          DMG_VERSION: ${{ steps.version.outputs.version }}
        run: |
          set -euo pipefail
          python3 <<'PY'
          from datetime import datetime, timezone
          from html import escape as html_escape
          from os import environ
          from xml.sax.saxutils import escape as xml_escape, quoteattr

          raw_notes = open("notes_temp.txt", encoding="utf-8").read()
          release_notes = html_escape(raw_notes, quote=False).replace("\r\n", "\n").replace("\r", "\n")
          release_notes = release_notes.replace("\n", "<br />\n")
          release_notes = release_notes.replace("]]>", "]]]]><![CDATA[>")

          update_base_url = environ["UPDATE_BASE_URL"].rstrip("/")
          dmg_url = f"{update_base_url}/{environ['APP_NAME']}-{environ['DMG_VERSION']}.dmg"
          pub_date = datetime.now(timezone.utc).strftime("%a, %d %b %Y %H:%M:%S +0000")

          appcast = f"""<?xml version="1.0" encoding="utf-8"?>
          <rss version="2.0" xmlns:sparkle="https://sparkle-project.org/xml-namespaces/sparkle">
            <channel>
              <title>{xml_escape(environ['APP_NAME'])} Updates</title>
              <link>{xml_escape(update_base_url)}/</link>
              <description>Latest updates for {xml_escape(environ['APP_NAME'])}</description>
              <item>
                <title>Version {xml_escape(environ['VERSION'])}</title>
                <description><![CDATA[{release_notes}]]></description>
                <pubDate>{pub_date}</pubDate>
                <enclosure
                  url={quoteattr(dmg_url)}
                  sparkle:version={quoteattr(environ['BUILD'])}
                  sparkle:shortVersionString={quoteattr(environ['VERSION'])}
                  length={quoteattr(environ['SIZE'])}
                  type="application/octet-stream"
                  sparkle:edSignature={quoteattr(environ['SIG'])}/>
              </item>
            </channel>
          </rss>
          """
          open("appcast.xml", "w", encoding="utf-8").write(appcast)
          PY

      # 10) Push DMG + appcast.xml to public updates repo using DEPLOY_KEY.
      - name: Setup Deploy Key
        run: |
          mkdir -p ~/.ssh
          echo "${{ secrets.DEPLOY_KEY }}" > ~/.ssh/deploy_key
          chmod 600 ~/.ssh/deploy_key
      - name: Push to public updates repo
        env:
          GIT_SSH_COMMAND: 'ssh -i ~/.ssh/deploy_key -o StrictHostKeyChecking=no'
        run: |
          git clone "$UPDATES_REPO_SSH" deploy
          cp output/*.dmg deploy/
          cp appcast.xml deploy/
          cd deploy
          git config user.name "GitHub Actions"
          git config user.email "[email protected]"
          git add .
          git commit -m "Release ${{ github.event.release.tag_name }}"
          git push origin "$UPDATES_BRANCH"
Tip: The full gist includes all notarization and stapling steps. It also auto-extracts version/build from Info.plist, uses the GitHub Release body as release notes, and sets the DMG enclosure with the correct sparkle:edSignature produced by sign_update.
Step 7 — Add all required GitHub Secrets (checklist)
Set these in the APP repo (Settings → Secrets and variables → Actions):
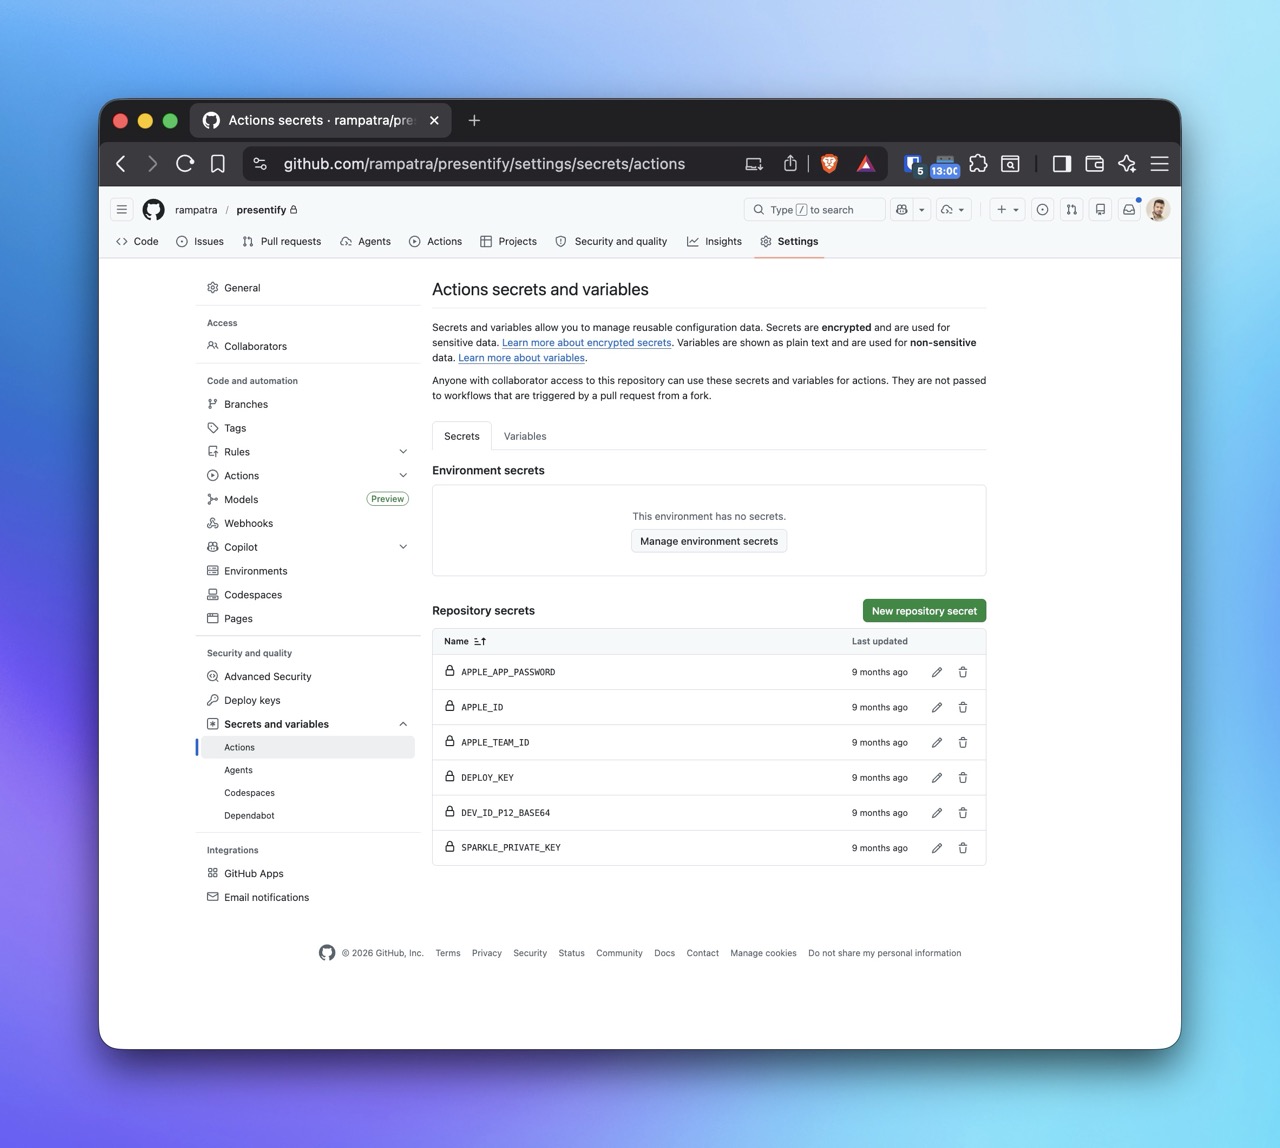
DEV_ID_P12_BASE64— Base64 of your exported Developer ID Application.p12DEV_ID_P12_PASSWORD— Password used while exporting the.p12(blank if none)APPLE_ID— Your Apple ID email (for notarization)APPLE_APP_PASSWORD— App-specific password created atappleid.apple.comAPPLE_TEAM_ID— Your 10‑char Apple Team IDSPARKLE_PRIVATE_KEY— Ed25519 private key (matchingSUPublicEDKeyin app)DEV_ID_SIGN_IDENTITY— Optional explicit signing identity stringDEPLOY_KEY— Private SSH key used to push into the updates repo
The final APP repo secrets list should look like this:
Step 8 — Publish a release to trigger the workflow
- Bump your app’s version and build in
Info.plist. - Tag a release from GitHub → Releases → Draft a new release:
- Tag version, e.g.,
v2.3.0 - Release title and description — this becomes your Sparkle release notes
- Publish release
- Tag version, e.g.,
- The workflow runs automatically:
- Builds and signs your app, re-signs Sparkle nested items
- Notarizes both the app zip and the DMG
- Signs the DMG with Sparkle’s Ed25519 key
- Generates
appcast.xml - Pushes
YourApp-<version>.dmgandappcast.xmlto<updates-repo>
- Verify:
- DMG:
https://<your-username>.github.io/<updates-repo>/YourApp-<version>.dmg - Appcast:
https://<your-username>.github.io/<updates-repo>/appcast.xml
- DMG:
Step 9 — Point your app to the feed
Ensure your app’s Info.plist has:
SUPublicEDKey→ the exact public key from Step 3SUFeedURL→ the Pages URL toappcast.xml
When you run a previous version of your app, Sparkle should detect the update and apply it (assuming versions increase correctly and signatures match).
Troubleshooting
- Notarization fails with “Invalid” or “Rejected”:
- Inspect the notarization log printed by the workflow. Fix entitlements and re-signing of Sparkle XPCs; verify
codesign --verify --deep --strictis clean before notarization.
- Inspect the notarization log printed by the workflow. Fix entitlements and re-signing of Sparkle XPCs; verify
- Sparkle update fails to install:
- Ensure Sparkle nested binaries and XPCs are re-signed with the same Developer ID identity and the app is re-signed last with entitlements and
--options runtime. - Confirm
SUPublicEDKeymatches the private key used bysign_update.
- Ensure Sparkle nested binaries and XPCs are re-signed with the same Developer ID identity and the app is re-signed last with entitlements and
- “Host key verification failed” when pushing to updates repo:
- The workflow sets
GIT_SSH_COMMANDwith-o StrictHostKeyChecking=no. Make sureDEPLOY_KEYis the private key matching the deploy key added with write access in the updates repo.
- The workflow sets
- DMG not found / wrong name:
- Keep the app name consistent across
create-dmg, signing, and copy steps. Update file names if you rename the app.
- Keep the app name consistent across
Appendix — What this workflow does in detail
High-level sequence performed by the reusable workflow provided in the gist (sparkle-publish.yml):
- Install dependencies (
create-dmg,jq) and Sparkle CLI - Create a temporary keychain, import your Developer ID
.p12, and allow codesign access - Build the app with
xcodebuildwhile pointing codesign to the temporary keychain - Re-sign Sparkle framework components and XPCs, then re-sign the app with entitlements and timestamp
- Verify signing (
codesign --verify --deep --strict) and dump entitlements - Zip app for notarization, submit with
notarytool --wait, then staple - Create DMG, notarize DMG with
notarytool --wait, then staple - Sign DMG with Sparkle’s
sign_updateusing yourSPARKLE_PRIVATE_KEY - Extract version, build, size, signature; render
appcast.xmlusing the GitHub Release body as notes - Push DMG and
appcast.xmlto the public updates repo usingDEPLOY_KEY
You can copy this approach as-is and just replace names, paths, and URLs for your app.
