We will be using JBot––a tiny Java Framework––to develop a Facebook Bot.
Table of Contents
- Getting started
- Basic Usage
- Building a Fb Messenger Bot with JBot
- Usage
- Deploying in Production
- Documentation History
Getting started
Similar to Slack, Facebook is simple too but has few extra steps:
- Clone this project
$ git clone [email protected]:ramswaroop/jbot.git. - Create a facebook app and a page.
-
Generate a Page Access Token for the page (inside app’s messenger settings).
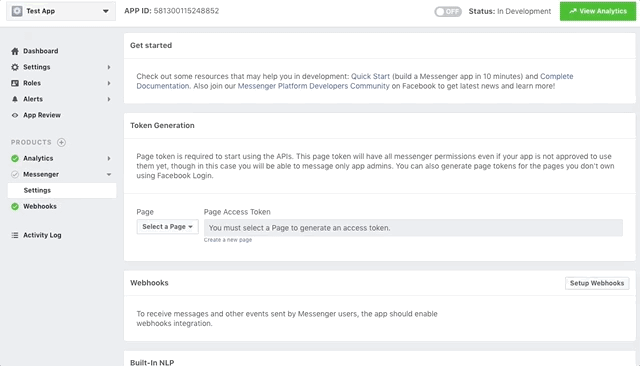
- Paste the token created above in application.properties file.
- Run the example application by running
JBotApplicationin your IDE or via commandline:$ cd jbot $ mvn clean install $ cd jbot-example $ mvn spring-boot:run -
Setup webhook to receive messages and other events. You need to have a secure public address to setup webhook. You may use localtunnel.me to generate a secure public address if you’re running locally on your machine.

-
Specify the address created above in “Callback Url” field under “Webooks” setting and give the verify token as
fb_token_for_jbotand click “Verify and Save”.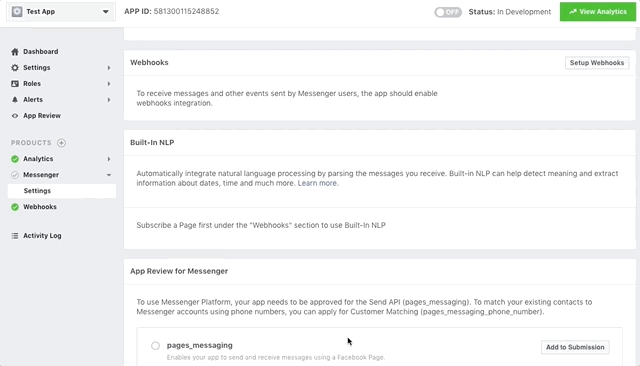


You can now start messaging your bot by going to the facebook page and clicking on the “Send message” button.
If you’re too lazy to start now and just want to play around, you can try jbot-example by visiting
JBot facebook page and clicking on the “Send Message” button.
Basic Usage
The main function of a Bot is to receive and reply messages. With JBot, receiving messages is as easy as just
writing a simple @Controller and replying to it by calling the reply() method as shown below:
@Controller(events = EventType.MESSAGE)
public void onReceiveMessage(Event event) {
    if ("hi".equals(event.getMessage().getText())) {
        reply(event, "Hi, I am JBot.");
    }
}
All the code for your bot goes in FbBot class which extends Bot from the core package. You can have as many bots as you want, just make the class extend Bot class and it gets all the powers of a Facebook Bot. Though it is recommended to have separate JBot instances for different bots.
Building a Fb Messenger Bot with JBot
Before we deep dive into the details, be sure you have a facebook app, a fb page and have setup webhooks. See the Getting Started section to learn more.
Setting up your bot
In facebook, we can make messenger bots for pages and not for users. To start using fb APIs, we need a page access token
which can be generated from any of your fb app settings. This page access token needs to be specified in
application.properties file in jbot-example. You can remove
“slack” from the spring.profiles.active as well. After this, you can start the bot by running JBotApplication from your IDE
or via command-line.
Once the bot is started, you can go to the app’s setting and setup webhooks. Give the secure url to your bot applcation,
you may use localtunnel.me to generate one if you’re running on your machine and not on any
server. You also need to provide a “Verify Token” which can be found in
application.properties file in fbBotToken property.
Receiving Messages
Facebook sends Callback to /webhook
for all the events your page has subscribed to. It sends as POST request to your /webhook endpoint.
Luckily, with JBot, you don’t have to worry about defining your own handler to handle those POST calls, parsing the
event etc. To receive events from Fb, you just have to define methods with @Controller annotation (from here on, we
will call them as @Controller).
i. Here is a simple example which gets invoked when your bot receives an event of type MESSAGE or POSTBACK from
facebook.
@Controller(events = {EventType.MESSAGE, EventType.POSTBACK})
public void onReceiveMessage(Event event) {
    if ("hi".equals(event.getMessage().getText())) {
        reply(event, "Hi, I am JBot.");
    }
}
ii. Another example which adds a pattern to the @Controller. Adding a pattern will restrict the method to be invoked
only when the event text or event payload (depending on the event type) matches the pattern defined. You can specify a
regular expression in pattern.
@Controller(events = {EventType.MESSAGE, EventType.POSTBACK}, pattern = "^(?i)(hi|hello|hey)$")
public void onGetStarted(Event event) {
    // quick reply buttons
    Button[] quickReplies = new Button[]{
            new Button().setContentType("text").setTitle("Sure").setPayload("yes"),
            new Button().setContentType("text").setTitle("Nope").setPayload("no")
    };
    reply(event, new Message().setText("Hello, I am JBot. Would you like to see more?").setQuickReplies(quickReplies));
}
You can optionally have a matcher as a formal parameter (after event) in the method if you want to work on the
matched values sent by the user. You can access by matcher.group(0), matcher.group(1) etc.
One thing to note here, the pattern will be matched against the text or payload depending on the event type
received. For the below example, the event received will be of type QUICK_REPLY and the pattern in this case will be
matched against the payload attribute in QuickReply and not against the text attribute.
@Controller(events = EventType.QUICK_REPLY, pattern = "(yes|no)")
public void onReceiveQuickReply(Event event) {
    if ("yes".equals(event.getMessage().getQuickReply().getPayload())) {
        reply(event, "Cool! You can type: \n 1) Show Buttons \n 2) Show List \n 3) Setup meeting");
    } else {
        reply(event, "See you soon!");
    }
}
You can see all the webhook events
that the messenger platform currently supports. You may see that there is no specific QUICK_REPLY event type listed
there. This is an extra event added by JBot to make your task easier.
Sending Messages
Like receiving, for sending messages to users from your bot you need to make POST calls to the
Facebook’s Send API. But again, with JBot,
you can simply reply by calling the reply() method from within your @Controller method. There are various overloaded
versions of the reply() method to suit your needs.
i. The simplest example is like,
reply(event, "Hi, I am Jbot.");
It takes an event object and a string which is the reply text.
ii. Another example in which JBot replies with two quick reply buttons:
// quick reply buttons
Button[] quickReplies = new Button[]{
        new Button().setContentType("text").setTitle("Sure").setPayload("yes"),
        new Button().setContentType("text").setTitle("Nope").setPayload("no")
};
reply(event, new Message().setText("Hello, I am JBot. Would you like to see more?").setQuickReplies(quickReplies));
If you see here, we have set payload in both the buttons. So, to know which button the user clicked you can have a
@Controller with event EventType.QUICK_REPLY and pattern as (yes|no) like below:
@Controller(events = EventType.QUICK_REPLY, pattern = "(yes|no)")
public void onReceiveQuickReply(Event event) {
    if ("yes".equals(event.getMessage().getQuickReply().getPayload())) {
        reply(event, "Cool! You can type: \n 1) Show Buttons \n 2) Show List \n 3) Setup meeting");
    } else {
        reply(event, "See you soon!");
    }
}
iii. In this example, JBot replies with two standard buttons:
Button[] buttons = new Button[]{
        new Button().setType("web_url").setUrl("http://blog.ramswaroop.me").setTitle("JBot Docs"),
        new Button().setType("web_url").setUrl("https://goo.gl/uKrJWX").setTitle("Buttom Template")
};
reply(event, new Message().setAttachment(new Attachment().setType("template").setPayload(new Payload()
        .setTemplateType("button").setText("These are 2 link buttons.").setButtons(buttons))));
iv. The last example shows JBot replying with a list of three items:
Element[] elements = new Element[]{
        new Element().setTitle("AnimateScroll").setSubtitle("A jQuery Plugin for Animating Scroll.")
                .setImageUrl("https://plugins.compzets.com/images/as-logo.png")
                .setDefaultAction(new Button().setType("web_url").setMessengerExtensions(true)
                .setUrl("https://plugins.compzets.com/animatescroll/")),
        new Element().setTitle("Windows on Top").setSubtitle("Keeps a specific Window on Top of all others.")
                .setImageUrl("https://plugins.compzets.com/images/compzets-logo.png")
                .setDefaultAction(new Button().setType("web_url").setMessengerExtensions(true)
                .setUrl("https://www.compzets.com/view-upload.php?id=702&action=view")),
        new Element().setTitle("SimpleFill").setSubtitle("Simplest form filler ever.")
                .setImageUrl("https://plugins.compzets.com/simplefill/chrome-extension/icon-64.png")
                .setDefaultAction(new Button().setType("web_url").setMessengerExtensions(true)
                .setUrl("https://plugins.compzets.com/simplefill/"))
};
reply(event, new Message().setAttachment(new Attachment().setType("template").setPayload(new Payload()
        .setTemplateType("list").setElements(elements))));
Here is a screencast which shows all the examples we discussed:
You should have a look at Facebook’s Send API for all kinds of replies the bot can send. For example, you can even send a receipt to your user, airline boarding pass and much more.
Conversations
This is a differentiating feature of JBot, with this you can literally talk to your bot and have a conversation. See below for an example as to how your bot sets up a meeting for your team by asking some simple questions one after the other.
/**
 * Type "setup meeting" to start a conversation with the bot. Provide the name of the next method to be
 * invoked in {@code next}. This method is the starting point of the conversation (as it
 * calls {@link Bot#startConversation(Event, String)} within it. You can chain methods which will be invoked
 * one after the other leading to a conversation.
 *
 * @param event
 */
@Controller(pattern = "(?i)(setup meeting)", next = "confirmTiming")
public void setupMeeting(Event event) {
    startConversation(event, "confirmTiming");   // start conversation
    reply(event, "Cool! At what time (ex. 15:30) do you want me to set up the meeting?");
}

/**
 * This method will be invoked after {@link FbBot#setupMeeting(Event)}. You need to
 * call {@link Bot#nextConversation(Event)} to jump to the next question in the conversation.
 *
 * @param event
 */
@Controller(next = "askTimeForMeeting")
public void confirmTiming(Event event) {
    reply(event, "Your meeting is set at " + event.getMessage().getText() +
            ". Would you like to repeat it tomorrow?");
    nextConversation(event);    // jump to next question in conversation
}

/**
 * This method will be invoked after {@link FbBot#confirmTiming(Event)}. You can
 * call {@link Bot#stopConversation(Event)} to end the conversation.
 *
 * @param event
 */
@Controller(next = "askWhetherToRepeat")
public void askTimeForMeeting(Event event) {
    if (event.getMessage().getText().contains("yes")) {
        reply(event, "Okay. Would you like me to set a reminder for you?");
        nextConversation(event);    // jump to next question in conversation
    } else {
        reply(event, "No problem. You can always schedule one with 'setup meeting' command.");
        stopConversation(event);    // stop conversation only if user says no
    }
}

/**
 * This method will be invoked after {@link FbBot#askTimeForMeeting(Event)}. You can
 * call {@link Bot#stopConversation(Event)} to end the conversation.
 *
 * @param event
 */
@Controller
public void askWhetherToRepeat(Event event) {
    if (event.getMessage().getText().contains("yes")) {
        reply(event, "Great! I will remind you tomorrow before the meeting.");
    } else {
        reply(event, "Okay, don't forget to attend the meeting tomorrow :)");
    }
    stopConversation(event);    // stop conversation
}
NOTE:
- Only the first method in a conversation can define a
pattern.patternattribute in@Controllerannotation has no effect for rest of the methods in a conversation. - The first method in the conversation need not call
nextConversation(event)but rest of the methods do need to. nextattribute in@Controllershould have the name of the next method in the conversation that needs to be invoked.- To end the conversation, call
stopConversation(event)inside your controller method.
Get Started Button
You can set the “Get Started” button by simply calling the setGetStartedButton("hi"); where “hi” is your payload. You
can see the init() method in FbBot.java. Just
uncomment the @PostConstruct after you’ve setup your webhook.
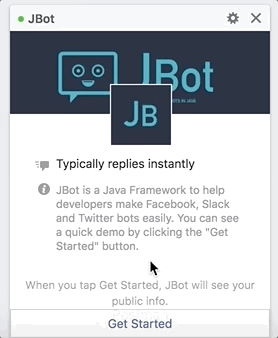
The “Get Started” button is only shown to users new to your bot. Learn more.
Greeting Text
The greeting text allows you to specify a message people will see on the welcome screen of your bot. The welcome
screen is displayed for people interacting with your bot for the first time. You can set the greeting text like:
setGreetingText(new Payload[]{new Payload().setLocale("default").setText("JBot is a Java Framework to help" +
                " developers make Facebook, Slack and Twitter bots easily. You can see a quick demo by clicking " +
                "the \"Get Started\" button.")});
You can define different greeting text for different locales.
Learn more.
Usage
You can directly clone this project and use jbot-example or you can include it as a maven/gradle dependency in your project.
Maven
<dependency>
    <groupId>me.ramswaroop.jbot</groupId>
    <artifactId>jbot</artifactId>
    <version>4.1.0</version>
</dependency>
Gradle
dependencies {
    compile("me.ramswaroop.jbot:jbot:4.1.0")
}
NOTE: When you include jbot as a dependency please make sure to include me.ramswaroop.jbot package for auto-scan.
For example, you can specify scanBasePackages in @SpringBootApplication or @ComponentScan. See
jbot-example to learn more.
Deploying in Production
You can use supervisord or similar tools for deploying this app in production. Here is a sample supervisord.conf
for this application:
[inet_http_server]
port=127.0.0.1:9001

[supervisord]
logfile=/tmp/supervisord.log
logfile_maxbytes=50MB
logfile_backups=10
loglevel=info
pidfile=/tmp/supervisord.pid
nodaemon=false
minfds=1024
minprocs=200

[rpcinterface:supervisor]
supervisor.rpcinterface_factory = supervisor.rpcinterface:make_main_rpcinterface

[supervisorctl]
serverurl=http://127.0.0.1:9001

[program:jbot]
command=mvn spring-boot:run
;directory=/var/www/jbot.ramswaroop.me/jbot/jbot-example/       ; change this
autostart=true
autorestart=true
;user=jbot                                                      ; change this
redirect_stderr=true
stdout_logfile=/tmp/jbot.log
Documentation History
- README-facebook-JBot-4.0.0 (Current)